
Let's see how to create this Okta account and configure the authorization server.
Set up your
authorization server
Okta can be used
as an Authorization server for implementing client credentials flow. To create
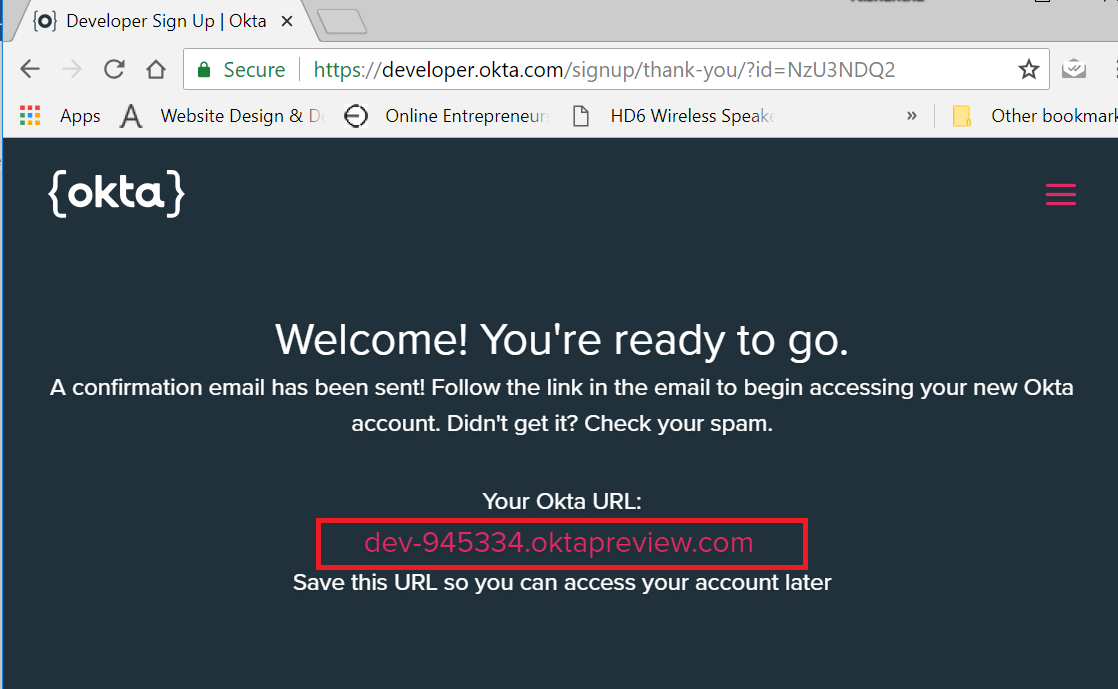
a Okta account, you can sign up to Okta using their official website

Keep a note on
the okta URL which is shown after signed up to okta.
Then, you will
receive an email from Okta with a temporary password.

Click on the Sign In
button and sign in with the username and temporary password. After that, enter
the new password and other information and click on Create My Account

Click on the
application tab the okta dashboard and click Add Application button to add a
new application.

Select on Service machine to machine button
and click Next

Give a name to
the service and then you will see the application details.

You will need
these Client Credential details in the next steps.
And you need to
create a custom scope since Client Credential never has a user context
That’s why you
must create a custom scope.
Creating
a custom scope
Go to the API
tab in the Okta dashboard and select Authorization Servers.
Then click on
edit icon.

Click
on the Scope tab and click on Add Scope button to add a scope.
Give a name and description for the scope and click Create button.

Now you can
check the authorization server
/token endpoint
using postman by sending a request with Basic Auth.
curl --request POST \
--url https://dev-945334.oktapreview.com/oauth2/default/v1/token \
--header 'accept: application/json' \
--header 'authorization: Basic MG9hY...' \
--header 'cache-control: no-cache' \
--header 'content-type: application/x-www-form-urlencoded' \
--data
'grant_type=client_credentials&redirect_uri=http%3A%2F%2Flocalhost%3A8080&
scope=customScope'
Postman
Authorization tab

Postman header
tab

Postman body tab

When you send
the request to the Authorization Server, it will respond the following access
token if the credentials are accurate.
{
"access_token":
"eyJraWQiOiJQaXFRUlktMnROdzVfSUVyNWkwVGlmVjJ4X19jMXNUd2JqbEpDVUdhdG84IiwiYWxnIjoiUlMyNTYifQ.eyJ2ZXIiOjEsImp0aSI6IkFULi1vSjZ1M2FzSEotcXdXUENFUC1NbUcxcjdlbFNTYU5IRkxrSHJoeHN2ZU0iLCJpc3MiOiJodHRwczovL2Rldi05NDUzMzQub2t0YXByZXZpZXcuY29tL29hdXRoMi9kZWZhdWx0IiwiYXVkIjoiYXBpOi8vZGVmYXVsdCIsImlhdCI6MTUzMDI0ODY4NSwiZXhwIjoxNTMwMjUyMjg1LCJjaWQiOiIwb2FmbTdsOWowSUVkTmx3aTBoNyIsInNjcCI6WyJjdXN0b21TY29wZSJdLCJzdWIiOiIwb2FmbTdsOWowSUVkTmx3aTBoNyJ9.Fb_PkFNHmtn1Iwz9vIe8u2ngBw1qzkwqaiuOI0oJOmztjPxl9u5niqc2cgthU7bB5SUBVVqYpodRoDaIOMrjBwIaPNCnOKuFiRoJtQ2C1tDTwUT9ENSgbUQwBFs3fznr8s75W5MCdmIn21mlM9nsKnKbAGXfhYcMBjFWu8v9d-ZE38TkYMh1opjp0AvpNaBgU5qiRd335CrDm3Rv4Yx5CmX5J4cO97Dc68FDK-sFFaIRuNjgUxNjyS5fSx5lNxm9NCPloTXySDhpZeRvqMPMYPGpStEi0rCGpC-zrvbYy7DJOuMA5_Nf-yHMxUaDUYZrjdMZArhm3qN9J9b97LYAaA",
"token_type": "Bearer",
"expires_in": 3600,
"scope": "customScope"
}
To implement
sample client credential application, I will create a Spring Boot server
application and Client application.
The server
application which is a resource server (API Service) is a simple and consist of
a single /mod end point.
Create
Resource server app
Create Spring
Boot project with security and web as dependencies and then add one more
dependency to the pom.xml file
<dependency>
<groupId>org.springframework.security.oauth.boot</groupId>
<artifactId>spring-security-oauth2-autoconfigure</artifactId>
<version>2.0.0.RELEASE</version>
</dependency>
Add server
application to include @EnableResourceServer annotation and add a simple Rest Controller
@EnableResourceServer
@SpringBootApplication
public class ServerApplication {
public static void main(String[] args) { SpringApplication.run(ServerApplication.class, args); } /** * Allows for @PreAuthorize annotation processing.
*/
@EnableGlobalMethodSecurity(prePostEnabled = true) protected static class GlobalSecurityConfiguration extends GlobalMethodSecurityConfiguration { @Override protected MethodSecurityExpressionHandler createExpressionHandler() { return new OAuth2MethodSecurityExpressionHandler(); } }@RestController
public class MessageOfTheDayController { @GetMapping("/mod") @PreAuthorize("#oauth2.hasScope('custom_mod')") public String getMessageOfTheDay(Principal principal) { return "Hello, Good morning: " + principal.getName(); } }
Then rename application.properties file
to application.yml and update it as follows
security:
oauth2: client: clientId: {client-id-from-above} clientSecret: {client-secret-from-above} resource: tokenInfoUri: {issuer-uri-from-above}/v1/introspect
Now you can run
the server application and you can
try to access http://localhost:8080/mod.
it
will respond with a, HTTP 401 UNAUTHORIZED
Create
the Client App
Next, you create
a simple command line app (or API service), so create a Spring Boot project
with security dependency and oauth dependency to the pom.xml as we did to the
resource server.
<dependency>
<groupId>org.springframework.security.oauth.boot</groupId> <artifactId>spring-security-oauth2-autoconfigure</artifactId> <version>2.0.0.RELEASE</version></dependency>
Rename application.properties to application.yml and
add the following info
example:
baseUrl: http://localhost:8080
oauth2:
client:
grantType: client_credentials
clientId: {client-id-from-above}
clientSecret: {client-secret-from-above}
accessTokenUri: {issuer-uri-from-above}/v1/token
scope: custom_mod
server:
port : 8081
Here, I
configured a few properties:
baseUrl is the
base URL of our example server
grantType
defines the grant type for the connection
clientId and
clientSecret are the same as above
accessTokenUri
defines the URI used to get an access token
scope is the
custom scope we created above
In Demo
Application,
@SpringBootApplication
public class DemoApplication implements CommandLineRunner {
private final Logger logger = LoggerFactory.getLogger(DemoApplication.class); @Value("#{ @environment['example.baseUrl'] }") private String serverBaseUrl; public static void main(String[] args) { SpringApplication.run(DemoApplication.class, args); } @Bean @ConfigurationProperties("example.oauth2.client") protected ClientCredentialsResourceDetails oAuthDetails() { return new ClientCredentialsResourceDetails(); } @Bean protected RestTemplate restTemplate() { return new OAuth2RestTemplate(oAuthDetails()); } @Override public void run(String... args) { logger.info("MOD: {}", restTemplate().getForObject(serverBaseUrl + "/mod", String.class)); }}
Note:
· The CommandLineRunner
interface adds run method that will automatically called once the application
initialized. And the application will be exited after this method.
· ClientCredentialsResourceDetails bean
is bound to configuration properties: example.oauth2.client
· OAuth2RestTemplate in place of a
standard RestTemplate
this automatically manages all the OAuth 2.0 access token exchange and sets the
Authentication: Bearer
header value. Basically, it handles all the OAuth details.
Now you can run
the client application and see the console output similar to below message
2018-06-29 11:43:20.396 INFO 63788 --- [ main]
com.nishantha.demo.DemoApplication
: MOD: Hello, Good morning: 0oafls01eedXspzFG0h7
No comments:
Post a Comment